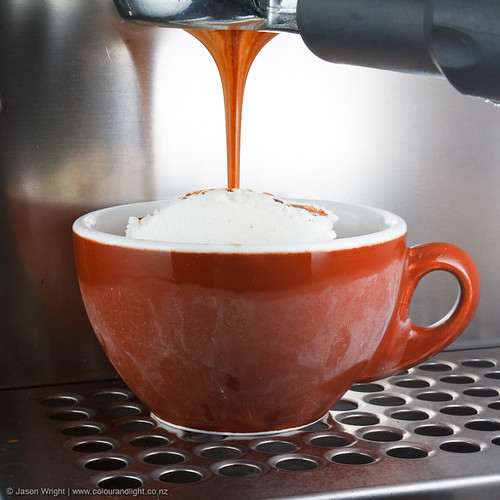
Easy peasy. You just get Jason to pull a shot of espresso over good quality vanilla icecream. It's called an affogato.
Wednesday, December 30, 2009
Monday, December 28, 2009
How to cook when it's too hot to cook
We really were spoiled this Christmas. The weather has been fantastic all week, we've had four days off work to enjoy it, and spent a couple of days relaxing with family. Perfect.
The only problem is, it's been too hot to cook! Reluctant to survive on salad alone, I usually get the barbeque going, and find a way to cook almost everything outside.
This year, we're taking it up a notch. With a BIG thank-you to Santa, we now have an outdoor gas cooker. Which means perfect pizza, and anything else you can throw in an oven. Last night, we had canneloni! Every other meal since Christmas, though, we've had pizza:
I'm not going to tell you how to make pizza. I'll show you the dough when it's not too hot to knead and take photos at the same time. In the meantime, I'm just going to show you what I put on mine last night!
Pizza sauce (tomato paste thinned with pasta sauce), sliced Coppa, red onion, and sundried tomatoes.
Pizza sauce (tomato paste thinned with pasta sauce), sliced Coppa, red onion, and sundried tomatoes.
..then smoked chicken, avocado, mushroom, and cheese to hold it all together (this is a mix of cheddar, mozzarella, and parmesan).
Use a giant novelty spatula to place the pizza in the oven for about 10 minutes (it's at about 220°C)
Move to the ceramic pizza stone for the last 2 minutes (this makes it lovely and crisp, and gives you an extra opportunity to use the novelty spatula.)

Move to the ceramic pizza stone for the last 2 minutes (this makes it lovely and crisp, and gives you an extra opportunity to use the novelty spatula.)
Yum.

Saturday, December 19, 2009
What I'm baking this Christmas
This is the second Christmas I've been addicted to gingerbread.. and I'm pretty sure that's enough to officially call it a tradition.
This is a reliable recipe for firm gingerbread biscuits which keep well, and makes about 20 full-size biscuits. The royal icing sets to an attractive finish that takes quite a beating without knocking off. Credit goes to an Australian Woolworths magazine, which I discovered via Google and taste.com.au (hey, don't let me be accused of not giving full credit to all involved), and the original link is here. I'm reproducing it here, because there are a few points which I feel I can add to the experience (other than saving you the trouble of hunting through all of the available recipes to find a good one).
You will need:
125g butter, at room temperature
100g (1/2 cup, firmly packed) brown sugar
125ml (1/2 cup) golden syrup
1 egg, separated
375g (2 1/2 cups) plain flour
1 tbs ground ginger
1 tsp mixed spice
1 tsp bicarbonate of soda
Plain flour, to dust
150g (1 cup) pure icing sugar, sifted
Food colouring, M&Ms etc to decorate
100g (1/2 cup, firmly packed) brown sugar
125ml (1/2 cup) golden syrup
1 egg, separated
375g (2 1/2 cups) plain flour
1 tbs ground ginger
1 tsp mixed spice
1 tsp bicarbonate of soda
Plain flour, to dust
150g (1 cup) pure icing sugar, sifted
Food colouring, M&Ms etc to decorate
Preheat oven to 180°C, and prepare 2 baking trays with baking paper r silicon baking mats
Use an electric beater to beat the butter and sugar in a bowl until pale and creamy. Add the golden syrup and egg yolk and beat until combined.
Stir in the flour, ginger, mixed spice and bicarbonate of soda.
Turn onto a lightly floured surface and knead until smooth. The dough will be very light and soft, so be prepared to flour the outside to make it more manageable.
Press dough into a disc, cover with clingwrap, and place in the fridge for at least 30 minutes to rest. This also cools the dough and makes it much easier to handle and cut.
While you wait, use an electric beater to beat the egg white in a clean bowl until soft peaks form.
Gradually add icing sugar and beat until stiff peaks form.
I divide the icing among 3 bowls: add red colouring to the first, green to the second, and leave the third white. You can, of course, use any colour your heart desires.. I'm just going with the Christmas theme, and the fact that I only have two colours in the pantry!
Stir it in, and add more until you get the colour you want. The icing will set to a slightly paler colour.
Transfer to small zip-lock bags (I use the tiny snack-size ones), and pop in the fridge for later (I leave these for up to a day before I get around to icing the cookies)
Once the dough has rested, roll out until about 4mm thick. Again, use flour to stop sticking.
Use the cutter of your choice to cut out shapes, and place on the baking tray immediately (if you let them get warm, they're impossible to handle).
If they stick, I use a thin silicon icing spatula to peel them off the board and transfer. Don't worry about spacing them too far apart on the tray: these don't really spread when they cook. 1cm apart is plenty.
Bake in oven 10-12 minutes or until brown. You'll see the colour change, but I don't let them get too brown or they have a little too much crunch for my liking.
Remove from the oven and transfer to a rack to cool.
Once cookies are completely cold, cut a small hole in a corner of each icing bag. Pipe icing over gingerbread men to decorate. Finish with M&Ms, silver cachous, or whatever you like (they're your cookies, after all!)
These are silver cachous. No, I didn't know what they were callled, either - but I read the packet and Mum has confirmed that it's true.
The icing takes at least an hour to set completely - make sure the icing is hard before you stack the ones you haven't already eaten in an airtight container.
Others I'm going to have to try:
Tiny 3D gingerbread houses designed to fit on the edge of your mug, by Not Martha. Gorgeous!
Soft and chewy gingerbread cookies at My Kitchen Cafe
To see what Jason did to my gingerbread (well, to the one he didn't eat!), click here.
Friday, December 18, 2009
DIY Pasta
Who ever knew that homemade pasta was this simple? I've made it twice this week (OK, possibly a little overboard), and this just beats the pants off the store-bought stuff.
Thanks to Jason for taking most of the photos, and for helping with the eating!
I tried an egg noodle recipe first - hand rolled and patiently cut with a sharp knife and a steady(-ish) hand, then grabbed a pasta machine on a whim (love those credit card loyalty points) and tried the real stuff. Surprisingly easy:
This is the whole recipe. For every 100g of standard flour, add one egg. One portion (100g flour) did the two of us for dinner - it's that easy. Really.
Dump it in a bowl, or straight on the bench, and use a fork to whisk the eggs and slowly incorporate the flour.
yes, I know that's a spoon. you should use a fork.
Be prepared to get your hands dirty, and knead it until it's smooth. Or wear latex gloves, they do an amazing job of stopping the egg from sticking to your hands, and make the whole thing a lot less daunting. Personally, I hate finding egg and flour under my fingernails hours later, no matter how well I scrub.
Now, walk away and let it rest. I just wrapped it in clingfilm and popped it in the fridge for a few hours while I got on with my life.
Now you have options: you can roll it by hand, as thin as you can, using lots of flour to stop it sticking.. and cut it as you please. Be prepared to work up a sweat.
OR you can splash out on a shiny new pasta machine - which will do all of the work for you: Just clamp it to the table, and follow the instructions. Feed through the rollers on the widest setting, and repeat a few times to work the dough. Fold it in half and feed again, working to get an even width.
Crank the rollers through the settings, and the sheet gets thinner and thinner - and starts to feel rubbery.
Dust with flour as you go to prevent sticking, and cut in half if the sheet gets too long.
Once you get to the last setting, the instructions suggest laying the sheets out for 15 minutes to rest - I found this dried the edges too much, and made it hard to feed into the cutter, so skipped this the second time with no noticeable difference.
Clip on the cutter attachment, and feed through one last time.
Look! Fettucine! It's magic!
Hang to dry on whatever you have handy.. you'll know when it's dry when it's hard and brittle, not soft and rubbery.
To cook, use lots of water (I ignore the ridiculous quantities they suggest for cooking dry pasta, but you really do need a bit more for fresh: the extra flour thickens the water quite a lot), and always salt your pasta water. If you don't, it will always taste as though the sauce is lacking in something.. and you don't want to waste all that effort! For fettucine, you'll want about 5 minutes - or until al dente.
[have no idea what happened to the picture of the finished product. will just have to make more!!]
Enjoy!
Subscribe to:
Comments (Atom)


